
No Bake Biscoff cheesecake (eggless) | Eggless no bake Lotus Biscoff cheesecake recipe | How to make no bake Biscoff cheesecake at home with step by step instructions
This 5 ingredient no bake Biscoff cheesecake (eggless) recipe is creamy, smooth, decadent dessert. It’s beautifully layered with a buttery biscuit base, rich & creamy cheesecake filling, and topped with a silky smooth Lotus Biscoff spread.
Moreover, this is prepared without using any setting agents like agar agar or gelatin.
Its then finished with crunchy Biscoff biscuit crumbs for that perfect balance of texture & flavor in every bite.
This turns out not too sweet, just perfectly indulgent – a dessert you’ll keep craving again & again!
A word about the Lotus Biscoff biscuits and Biscoff spread
Biscoff biscuits also known as speculaas or speculoos is a Belgian caramelised cookie that is baked with subtle flavor of cinnamon and nutmeg.
Biscoff spread is a creamy, sweet spread also known as cookie butter, is made of crushed Biscoff biscuits. It is 100% vegan and contains no nuts.
Ingredient list to make No Bake Biscoff cheesecake (Eggless)
This cheesecake literally uses 5 ingredients, so let’s have a look at them –
Biscoff biscuits –
The biscuits are used for making base of cheesecake along with butter. I have used Biscoff brand biscuits here in this recipe, however you can use any biscuit of your choice.
Biscoff spread –
This is a readymade spread easily available in stores or you can make it home. The recipe for the same is available online.
Butter –
Any salted or unsalted butter would work here. Make sure to melt it before using.
Cream cheese –
Make sure to use good quality cream cheese for making cheesecake. I have always used Philadelphia cream cheese but now a days D’lecta brand is going good.
Your choice to uses any of it, just make sure to use softened when making this recipe.
Whipped cream –
Whipped cream with stiff peaks adds the volume to cheesecake.
I like to use Rich or Tropolite brand heavy cream.
No Bake Biscoff cheesecake (eggless), one more addition to my cheesecake collection
Did I mention before in my posts, that I am huge fan of cheesecake? Well, if you are regular reader of my blog, I have a good collection of cheesecake recipes like –
Virgin Pinacolada no bake cheesecake
Strawberry cheesecake cupcakes
Hung curd cheesecake (eggless)
Hibiscus cheesecake (eggless and no bake)
Recipe Card 🔽
No Bake Biscoff cheesecake (eggless)
Ingredients
Method
- Blend 20 biscoff biscuits into a mixer jar to powder. Mix it with melted butter. It will resemble to a wet sand like mixture.
- Now take 6 inch springform cake pan. Line it with parchment paper.
- Spread the biscoff cookies and melted butter mixture at the bottom, press down it with bottom of glass to spread evenly.
- Place it in the refrigerator to chill while you prepare for the layers.
- Place your stand mixer blades and steel bowl in the freezer before you whip the cream.
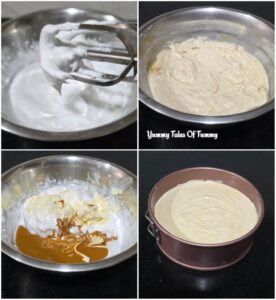
- After 30 minutes whip your heavy cream to stiff peaks.
- In a mixing bowl, whisk together cream cheese, biscoff spread and stiff peaks whipped cream until it’s smooth and creamy.
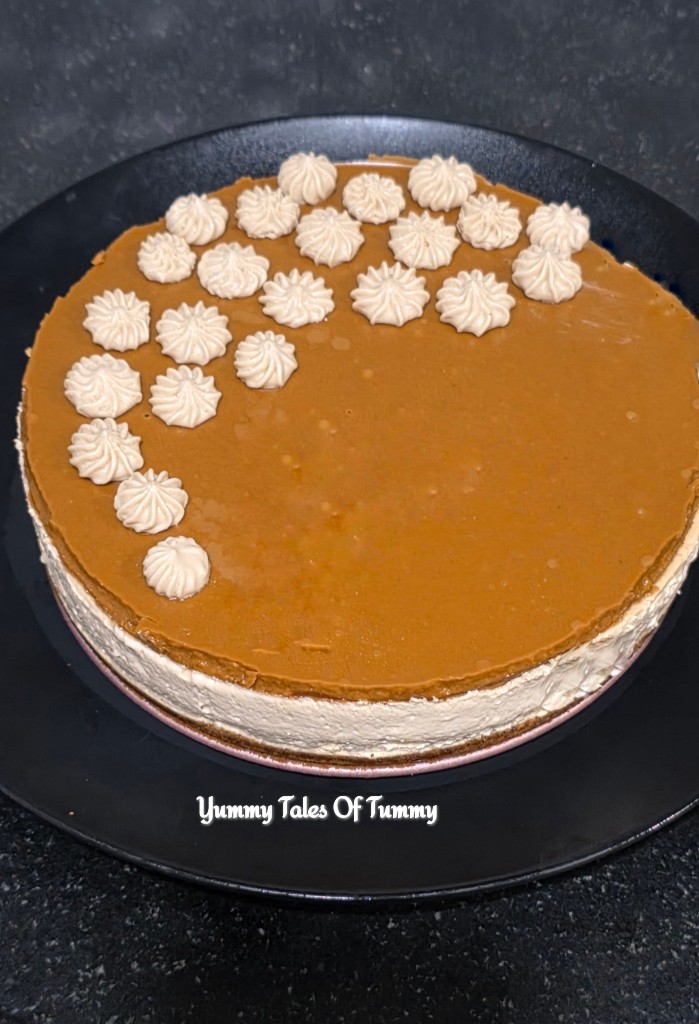
- Pipe or spread the cheesecake filling over the set biscuit base into an even layer using an offset spatula.
- Now refrigerate the 2 layer cheesecake for at least 6 hours or overnight, until it’s firm.
- Warm the Biscoff spread in microwave for a few seconds and spread an even layer of over second layer.
- Chill it further in the fridge for top layer to set perfectly.
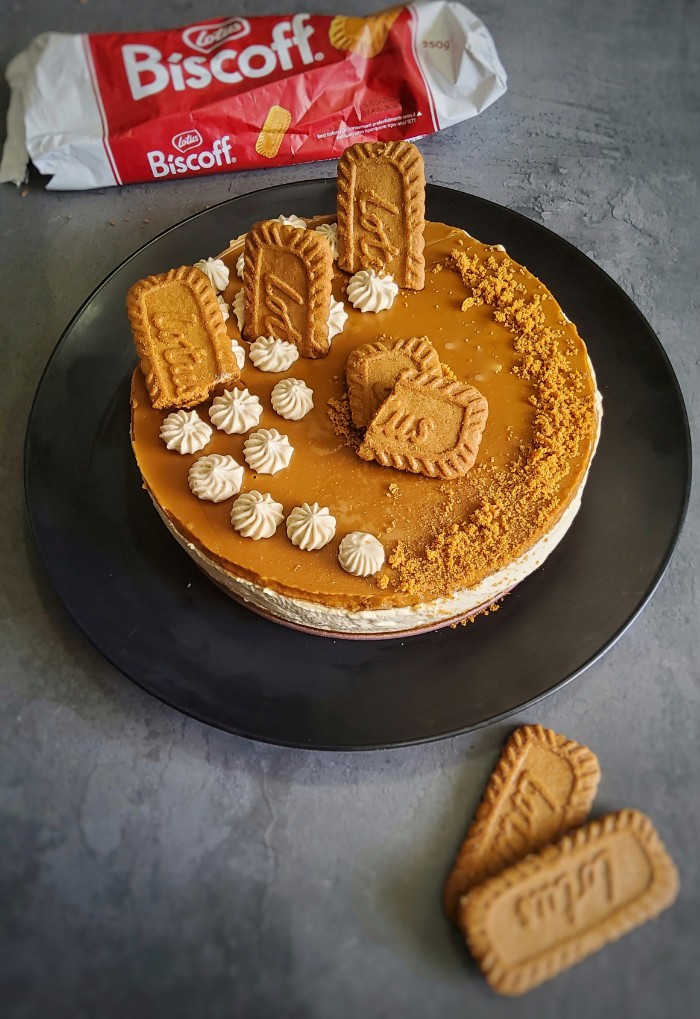
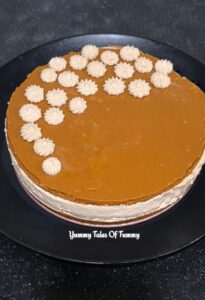
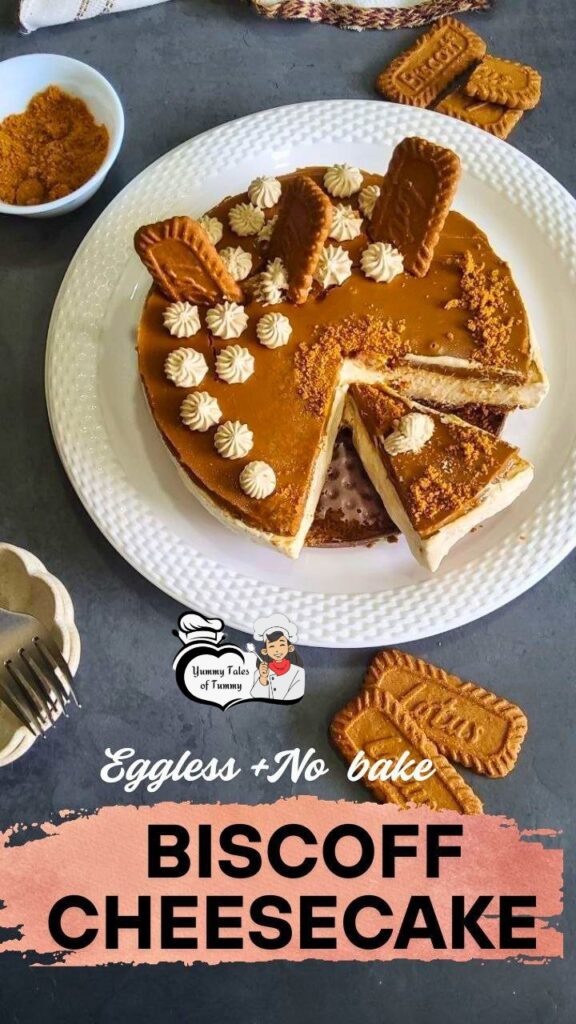
- While you serve, you can decorate the biscoff cheesecake however you like. I used whipped cream and Biscoff cookie butter mixture to pipe flowers on cheesecake. Moreover, added crushed biscuits on edges also.
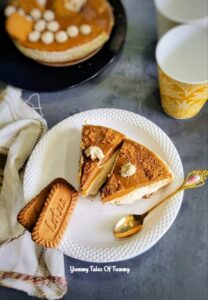
- It's ready to serve. Slice and enjoy.......
Notes
Step by step instructions and pictorial presentation to make No-Bake Biscoff cheesecake (Eggless)
For the base layer
Blend 20 biscoff biscuits into a mixer jar to powder. Mix it with melted butter. It will resemble to a wet sand like mixture.
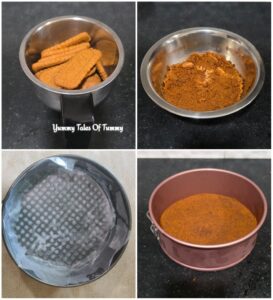
Now take 6 inch springform cake pan. Line it with parchment paper.
Spread the biscoff cookies and melted butter mixture at the bottom, press down it with bottom of glass to spread evenly.
Place it in the refrigerator to chill while you prepare for the layers.
For the middle layer
Place your stand mixer blades and steel bowl in the freezer before you whip the cream.
After 30 minutes whip your heavy cream to stiff peaks.
In a mixing bowl, whisk together cream cheese, biscoff spread and stiff peaks whipped cream until it’s smooth and creamy.
Pipe or spread the cheesecake filling over the set biscuit base into an even layer using an offset spatula.
Now refrigerate the 2 layer cheesecake for at least 6 hours or overnight, until it’s firm.
For top layer
Warm the Biscoff spread in microwave for a few seconds and spread an even layer of over second layer.
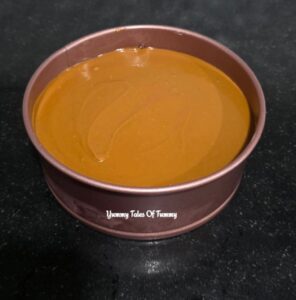
Chill it further in the fridge for top layer to set perfectly.
While you serve, you can decorate the biscoff cheesecake however you like. I used whipped cream and Biscoff cookie butter mixture to pipe flowers on cheesecake. Moreover, added crushed biscuits on edges also.
It’s ready to serve. Slice and enjoy…….
How to store leftovers?
While setting the base and filling I cling wrap it. Once un-molded, you can use a cover (dome) and refrigerate/ freeze. It will be good upto 5 days in fridge or freeze in an airtight box for a month. Thaw in fridge before night for serving next day.
Expert tips
Since i have been making lots of cheesecake recipes, I want to share some important notes here –
1. Make sure to always use good quality, cream cheese. I have learned over a period of time to use block cream cheese rather than spreadable tubs.
2. I haven’t added icing sugar while whipping the cream as Biscoff spread has enough sweetness.
3. Always use youe dairy products at room-temperature so that the mixture is without any lumps.
4. To make this recipe vegan, use vegan cream cheese and vegan whipping cream.
5. Always use a sharp knife to slice the cheesecake.
If you’ve tried this recipe or any other recipe on Yummytalesoftummy, don’t forget to rate the recipe and leave me a comment below!
I would love to hear your thoughts, variations and feedback. Your comments are helpful!! I love reading it and your feedback is valuable.
And if you took some pictures of it, share it with me on Instagram, so I can re-share on my post and stories!
I will see you soon with yet another interesting recipe. Come right back a I love to have you around.
Happy Cooking
Regards❤️
Lata
Pin it for future reference 🔽
")
")
 | Parsi Mava Cake")

")
